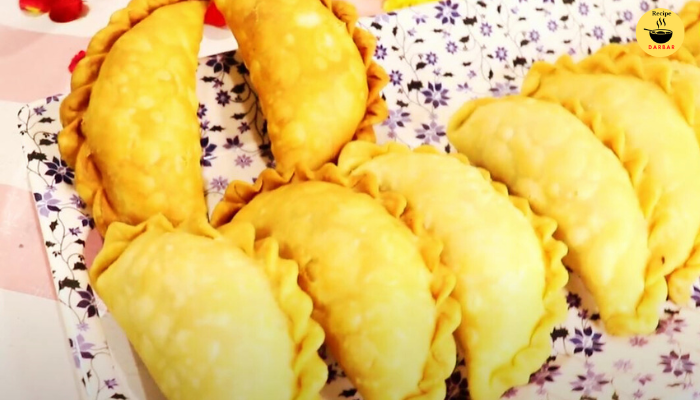
Gujiya is an authentic traditional Indian sweet dumpling filled with a rich mixture of coconut, mawa, and nuts. Gujiya’s delightful combination of textures and flavors makes it symbolic of joy and holds a special place in Indian culinary tradition. The crispy, flaky, & sweet aromatic Gujiya recipe is cherished especially during festivals like Holi and Diwali.
Making Gujiya is a labour of love. It is very easy to make but takes time, patience, and skill. But once you make them, you won’t regret the time spent, as they are a crispy outer shell combined with the sweet & nutty filling makes Gujiya taste amazing. Don’t panic if you can’t fold or seal the Gujiya / Karanji as shown below. I would like to share how to make a perfect Gujiya / Karanji recipe with step-by-step instructions, photos, Tips, and tricks.
What is Gujiya?
Gujiya, a delectable sweet dumpling, holds a special place in Indian culinary traditions. Often associated with festivals like Holi and Diwali, this crescent-shaped delicacy is filled with a rich mixture of khoya (mawa), dry fruits, and coconut, then deep-fried or baked to perfection. Usually a simple pastry dough that is rolled into circles and loaded with sweet stuffing, then shaped into half moons with a twist, and then deep fried.
Its flaky exterior and sweet, aromatic filling make it a favorite across various regions in India. While deep-frying is the conventional method, baked versions offer a healthier alternative without compromising on taste in India. Gujiya’s delightful combination of textures and flavors makes it a festive favorite, symbolizing the joy and indulgence of Indian celebrations.
Historical and Cultural Significance
Gujiya has deep roots in Indian culinary traditions. Historical records suggest that the origins of Gujiya track back to the 13th century, where it was initially made of a jaggery-honey mixture encased in wheat flour by sun-drying. Over time, the recipe evolved, incorporating Coconut, dry fruits, & Khoya (Mawa), then deep-fried in ghee or oil and also baked to perfection.
Only shape & stuffing change, Gujiya is known by different names across India.
Variations Across Regions
| Maharashtra | Known as Karanji ( filled with coconut and jaggery ) |
| Gujarat | Called Gughar. |
| Andhra Pradesh | Kajjikailu or Karjikay ( filled with coconut and sugar ) |
| Tamil Nadu | Somas /Karachika/Suryakala or Chandrakala ( unique shapes and fillings ) |
| Goa | Known as Nevris ( prepared during Ganpati and Christmas) |
| Bihar | Called Pedakiya ( with variation using semolina and khoya ) |
| North India | Known as Gujiya ( filled with dry fruits & khoya ) |
Despite regional names and variations, it highlights the popularity and cultural importance of Gujiya as a festival treat symbolizing joy and togetherness.
Required Ingredients – ( what you need to make Gujiya )
Main Ingredients:
For the Dough:
- Plain flour (maida) – 2 cups
- Ghee or oil – ¼ cup (clarified butter)
- A pinch of salt
- Water -As required to knead the dough
For the Filling:
- Dry Grated coconut – 1 cup
- Semolina /suji – 1/2 cup
- Powdered sugar – 1/2 cup
- finely chopped mixed nuts (almonds, cashews, pistachios) – ¼ cup
For Frying:
- Oil or ghee ( For deep frying )
( For a healthier version, Gujiyas can be baked instead of fried )
Kitchen tools:
- Deep Frying Pan or Kadai
- Rolling Pin & board
- Slotted Spoon
- Mixing bowl
How to Make Gujiya Recipe – Step-by-Step Process:
Step 1: ( Prepare the dough )
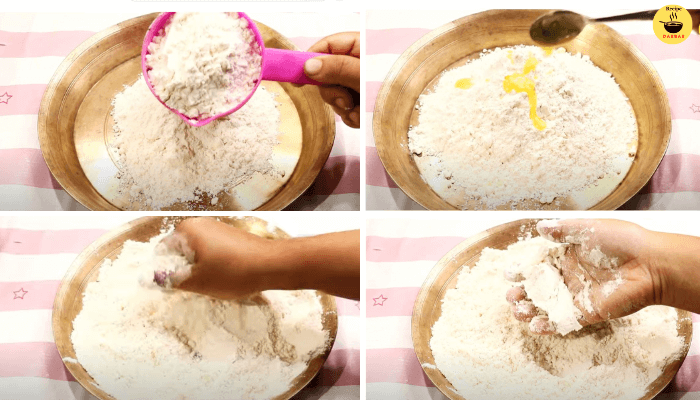
- To make Dough, in a mixing bowl or a Parat, add a cup of Maida/Plain flour and a pinch of salt.
- Then heat the ghee until it’s warm add the melted Ghee. Mix & combine Everything Well until it has a crumbly texture.
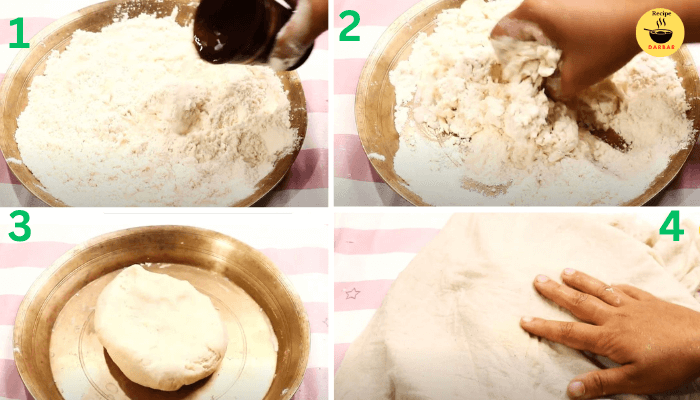
- Gradually add water and knead it into a semi-stiff but firm dough. Knead it for a few more minutes, the dough gujiya would be more crisp and tastier.
- It should be smooth and Pliable But not sticky. A soft dough will make for a soft crust, and it won’t be flaky and crispy.
- Cover with a damp cloth & rest it for 20 minutes. Resting the dough helps in rolling it thinly.
- Knead it for a few more minutes as the more we knead the dough, the gujiya will be crispier and tastier.
Step 2 : (Making Filling )
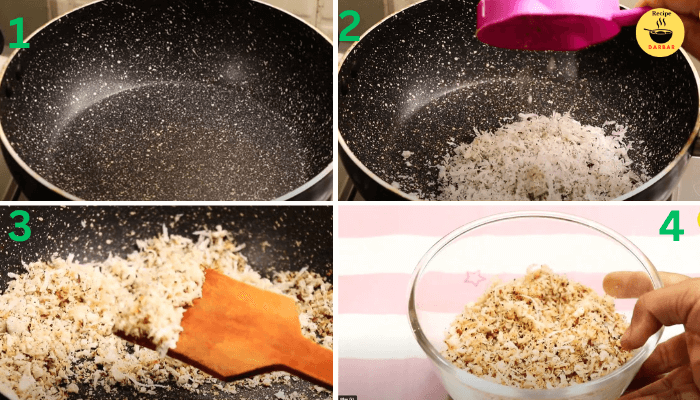
- Heat a pan and add 1 cup of grated coconut.
- Stir & roast over medium heat until it turns light golden and releases a pleasant aroma. It takes 2 to 3 minutes.
- Save on a mixing bowl & allow it to cool.
Step 3 : (Roasting the sooji or semolina)
- Heat a frying pan with 2 tbsp of ghee.
- Ghee melted, add ½ cup of sooji or semolina.
- Keep flame medium & roast until golden.
- Sooji or semolina looks golden. Take out & save on a plate.
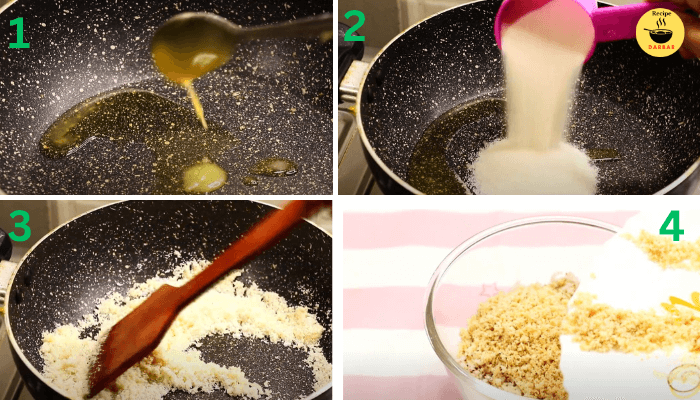
- In a mixing bowl, combine the cooled coconut, sooji (semolina), chopped nuts, and ½ cup of powdered sugar.
- Mix thoroughly to form a cohesive sweet filling. Keep aside.

Step 4: ( Assembling the gujiyas )
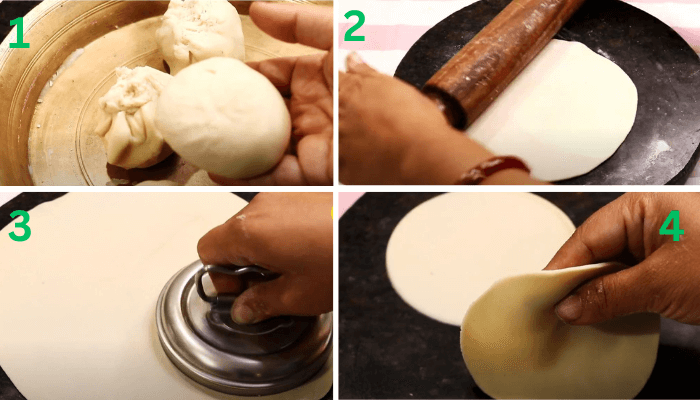
- Knead the rested dough once. Divide into small equal portions.
- Take a portion and smooth it once & keep the rest covered. Otherwise, they will be dried, resulting in difficulty rolling.
- Take a ball, roll it out using a rolling pin like roti on a lightly floured surface.
- Take a round shape cutter or lid and cut it into circles. Or roll each ball into a small circle, about 4 inches in diameter. Mini thicker roti done.
- Place a spoonful of prepared filling in the center of the rolled-out dough.
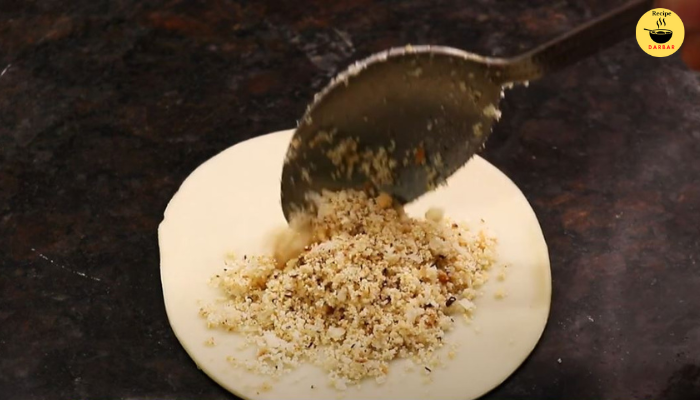
- Moisten the edges of the circle with water.
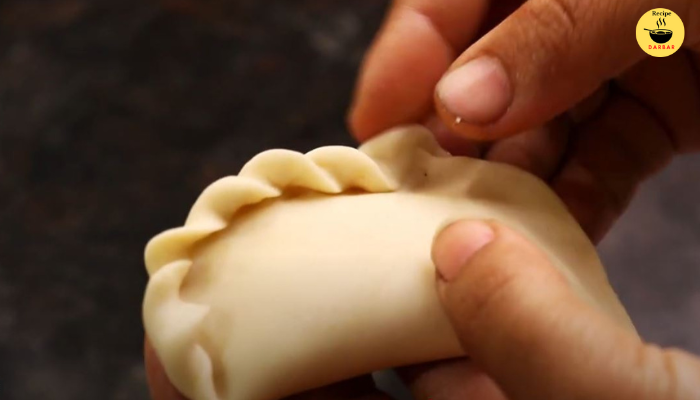
- Fold the dough over to form a semicircle, enclosing the filling. Press the edges together to seal.
- Ensure that the edges are sealed properly with the help of a thumb impression.
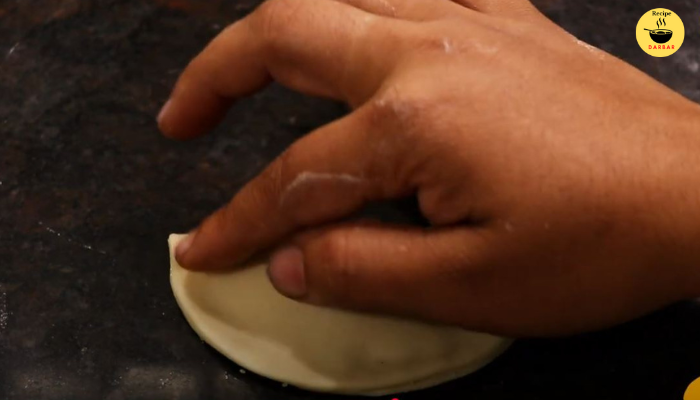
- Now start twisting from one edge to the other, make a peated impression to prevent the filling from spilling out during frying.
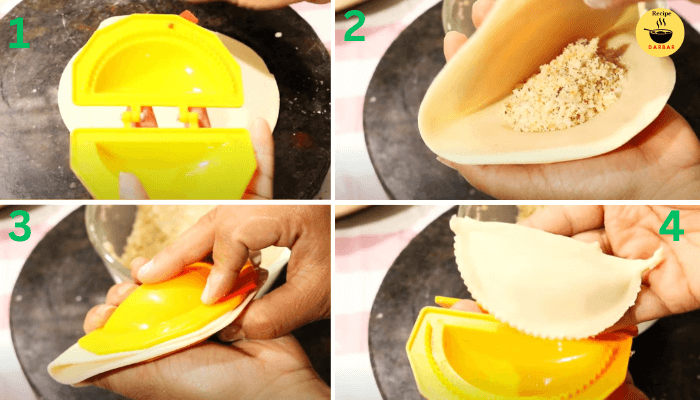
- If you use a gujiya mold or crimp the edges manually for a decorative traditional look. Place the circle on the gujiya mould & fill one tbsp of the stuffing in the centre. Now, apply water on the edges of the circle and close the mould to seal the sides properly.
- Repeat the process for the remaining dough and filling. Keep them covered with a moist cloth so that the dough doesn’t dry out.
- Serve gujiya to your family, friends, and guests.
Step 5: ( Cooking the Gujiyas )
For deep frying:
- Heat oil or ghee in a frying pan over medium heat.
- Once the oil is lukewarm, Gujiya is not fried in too hot oil, otherwise, the gujiya will brown quickly, and they won’t be fried evenly.
- Carefully slide 3 to 4 prepared gujiya pieces at a time.
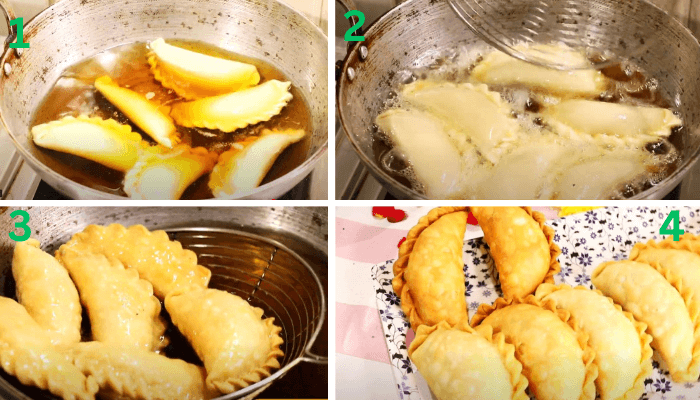
- Stir occasionally, and fry until golden and crispy evenly.
- Once it’s done, use a slotted spoon to drain them on a paper towel to remove excess oil.
- Allow them to cool completely.
For baking:
- Preheat the oven to 200 c & place the prepared gujiyas on a baking tray lined with parchment paper.
- Bake it for 15 to 20 minutes or until they turn golden brown. In the middle stage, brush each with a little melted ghee.
- Before serving, cool them completely.
Optional Sugar Syrup Coating:
- Heat a saucepan. Add the same quantity of sugar & water.
- Heat until the sugar dissolves, mix, and bring to a boil.
- Add cardamom powder, saffron for flavor.
- Mix and boil until the syrup reaches a one-string consistency, then switch off the flame & keep it warm on the side.
- Dip the fried gujiya into syrup, ensuring they are well-coated.
- After 30 seconds, remove & place them on a plate.
- The syrup will crystallize, giving a glossy finish to the gujiya.
Serving Suggestions:
- Gujiya is eaten like any Indian sweets as it is. served warm or at room temperature.
- Pair with a glass og masala chai or thandai for a delightful festival treat.
Variations:
- Gulkand Gujiya – Incorporate gulkand into the filling for a floral twist.
- Chocolate Gujiya – add cocoa powder or chocolate chips to the filling for a modern take.
- Savory Gujiya – Use a spicy mixture of mashed potatoes, peas, and spices for a savory snack.
- Baked Gujiya – For a healthier option, bake the gujiya.
Pro Tips:
- Must fry gujiya on a low to medium flame. High heat will make it dark in color and won’t be fried evenly. Low heat will give the gujiya the desired crispy outer skin.
- Don’t add ghee or oil more than the mentation quantity while kneading the dough, else the dough becomes soft and the gujiya can pop while frying.
- Try to knead the dough for at least 10 minutes for crisper gujiya.
- Try to use a gujiya mould when making a huge batch of gujiya, it will give uniform shape to all gujiya as well as save effort and time.
- Don’t add more stuffing in the gujiya; otherwise, this may result in popping while frying.
- Sprinkle some powdered sugar or chopped nuts on top before serving for an extra touch of indulgence.
Frequently Asked Questions :
Can I bake the Gujiya?
Yes, you can choose the alternative to deep frying by baking your Gujiyas. Preheat the oven to 200 °C, place them on a baking sheet & bake for 20 -30 minutes until golden & crispy.
Why did Gujiya become hard?
If you did not add enough oil or ghee & over over-kneaded the dough.
What is the shelf life of Gujiya?
Gujiya can stay fresh in an airtight container for around 1 to 2 weeks.
Why did Gujiya fill the lake?
It may be due to improper sealing or overfilling. Excessive filling can break the dough. During frying by firmly pinch the edges to ensure a tight seal.
Why do gujiyas get blisters or bubbles?
If the oil is too hot gujiya gets bubbles.
🔥 Quick Safety Tips While Cooking
- Be careful with hot oil – Add Khaja slowly.
- Avoid Overcrowding – Frying in small batches.
- Keep the stove attended – Never leave your dish unattended on a high flame.
- Use the Right Equipment – Avoid nonstick cookware, use a heavy-bottomed pan.
- Control Oil Temperature – Maintain optimal range & avoid overheating.
You might enjoy this recipe too. If you loved that, try this from our favorites:
Conclusion & Suggestion:
Gujiya holds a special place in Indian festive traditions. It’s a staple during Holi & Diwali celebrations, symbolizing joy and the arrival of spring. Whether you’re sticking to the classic and yummy recipe or experimenting with different modern fillings, making gujiya at home is a rewarding culinary experience that brings joy to both the Gujiya maker and eater. So this festival season roll up your sleeves and indulge in the delightful process of crafting these sweet dumplings.
- For a visual guide on preparing Gujiya, you might find this video helpful.
💬 Tried This Recipe?
Let us know how it turned out in the comments below!
Share your version on Instagram and tag us with #GujiaRecipe.
👉 Follow us for more Indian recipes that excite your palate!